Preparing your car with a thorough wash and essential checks is key for exterior detailing. DIY repairs like wiper blade replacement and fluid topping save time, money, and enhance vehicle maintenance skills. Wash, clay bar treat, restore headlights, and address tire care to maintain value. Apply automotive sealant based on climate and paint type, then inspect and buff for a final shine. Select the right DIY auto repairs products for optimal results in preserving your car's look.
Looking to give your car a sparkling, showroom-worthy finish? This comprehensive guide walks you through the essential steps for auto exterior detailing, perfect for those considering DIY auto repairs. From preparing your car for detailing to applying sealant and final inspection, each step is designed to enhance your vehicle’s appearance. Armed with the right knowledge, you can achieve professional results while saving on costly services. Select DIY Auto Repairs today and transform your ride!
- Prepare Your Car for Detailing
- Wash and Clay Bar Treatment
- Wheel and Tire Care
- Sealant Application
- Final Inspection and Protection
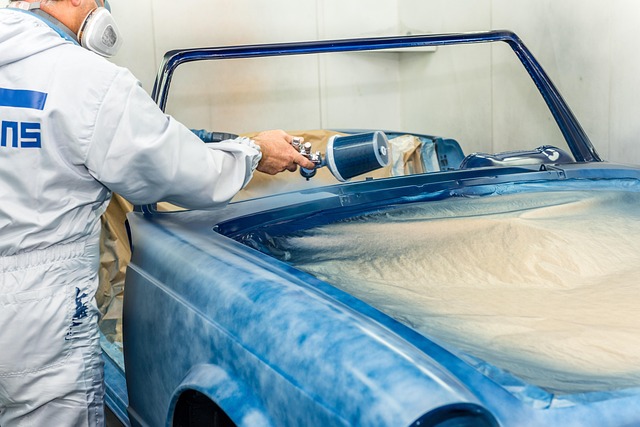
Prepare Your Car for Detailing
Before diving into the exterior detailing process, preparing your car is a crucial step that sets the stage for optimal results. Begin by performing a thorough wash to remove dirt and grime accumulated over time. This initial step is essential in ensuring that your car’s surface is clean and ready for the detailed treatment ahead. A simple transmission fluid check and addressing any car battery charging problems should also be part of your pre-detailing routine, as these basic yet vital maintenance tasks contribute to a smooth detailing experience.
Selecting DIY auto repairs can save you time and money, especially when it comes to exterior care. For beginners, this might involve learning some simple auto repairs, such as how to replace a wiper blade or top up your car’s fluids. By taking the time to prepare your car correctly, you’ll not only enhance its appearance but also gain valuable skills in vehicle maintenance.
Wash and Clay Bar Treatment
A crucial step in auto exterior detailing is the wash and clay bar treatment. Begin by selecting DIY auto repairs that are suitable for your skill level and vehicle type. This process involves thoroughly washing your car to remove dirt, dust, and debris from the surface. Use a high-quality car shampoo and microfiber towels for a streak-free finish. Once the car is clean, it’s time to bring out the clay bar. A clay bar treatment helps to fix a low tire pressure by removing bonded contaminants that regular washing might miss. These contaminants can include tar, sap, or industrial pollutants, which can leave behind residue and cause tire issues.
For optimal results, follow up with a DIY headlight restoration using a dedicated polishing compound. This step not only enhances the look of your headlights but also improves their performance by increasing visibility at night. Remember, proper detailing isn’t just about aesthetics; it’s also about maintaining and preserving the value of your vehicle. In light of these considerations, a car ac recharge kit might be a useful addition to your DIY arsenal, ensuring that your air conditioning system functions optimally during hot weather conditions.
Wheel and Tire Care
When it comes to auto exterior detailing, wheel and tire care is an often-overlooked but crucial step. It’s important to give your car’s wheels and tires the same level of attention as the rest of the vehicle. Start by cleaning them thoroughly with a dedicated tire cleaner or soapy water. This removes dirt, grime, and even brake dust, which can dull your tires over time. Once clean, consider treating your tires with a tire conditioner or gloss to enhance their appearance and protect against fading.
For wheel care, begin by removing any dirt and debris using a wire brush or dedicated wheel cleaner. If you’re up for a DIY auto repair challenge, this is also the right time to inspect your wheel rims for any signs of rust or damage. Minor issues can often be addressed with simple fixes like sanding and painting. Remember, maintaining your wheels and tires not only improves their visual appeal but also ensures they function optimally, contributing to better overall vehicle performance.
Sealant Application
After cleaning and waxing your vehicle’s exterior, the next step is applying a sealant to protect its freshly detailed surface. This process creates an extra barrier against environmental elements like dirt, dust, and UV rays, extending the life of your car’s paint job. Start by selecting a high-quality automotive sealant that suits your vehicle’s needs; there are various options available for different climates and paint types.
When it comes to DIY auto repairs, applying sealant can be a great project to enhance your ride’s aesthetics. Ensure you follow the manufacturer’s instructions carefully for optimal results. Typically, you’ll apply the sealant with a microfiber cloth or applicator, working in small sections at a time. Allow the sealant to dry according to the specified timing, usually a few hours, before moving on to other detailing tasks like wheel cleaning or window treatment. Remember, proper DIY timing belt replacement guide resources and safety precautions can make even complex auto maintenance tasks accessible for car enthusiasts.
Final Inspection and Protection
After completing all the detailing steps, it’s time for a final inspection and protection of your vehicle’s exterior. This crucial stage ensures that your car looks its best and remains in excellent condition. Carefully inspect every inch of the painted surfaces, trim, and accessories to identify any missed spots or imperfections. Look for water spots, smudges, or scratches that might have been overlooked during the cleaning process. Using a microfiber cloth, buff the surface gently to enhance the shine and ensure a smooth finish.
Consider applying a high-quality car wax or sealant as the final protective layer. This step not only adds extra gloss but also creates a barrier against environmental elements, including UV rays, bird droppings, and tree sap. Remember, selecting the right DIY auto repairs products is essential for optimal results. By protecting your exterior, you’re safeguarding your investment and maintaining that new-car look for longer, even after tackling tasks like how to change oil yourself or diy muffler repair.
After completing these meticulous auto exterior detailing steps, from preparing your car to the final inspection, you’ve enhanced its aesthetic appeal and protection. Remember, selecting DIY auto repairs like these can not only save costs but also foster a sense of accomplishment. Keep in mind that regular maintenance, such as sealing and waxing, is key to preserving your vehicle’s exterior, ensuring it continues to turn heads on the road.